Outline:
- Introduction
- Importance of Using a Photocell for Outdoor Lighting
- Types of Photocell Light Sensors Available for Outdoor Lights
- Step-by-Step Guide to Wiring a Photocell to Outdoor Lights
- Common Issues and Their Solutions while Installing Photo Cell Light Switch
- Why Choose Chiswear Photocells?
- The Bottom Line
Outdoor lighting plays a crucial role in enhancing the aesthetics, security, and functionality of your outdoor spaces. Technology has made things even better and smarter. One standout in this progress is the photocell, a clever addition to outdoor LED lights that makes them even more efficient.
A photocell helps save energy by turning off the outdoor lights when they’re not really needed. Imagine your lights automatically know when it’s bright enough outside, and they take a break. That’s the magic of the photocell, making outdoor lighting both energy-friendly and practical.
In this guide, we’ll break down the basics of connecting a photocell to outdoor lights. We’ll keep it simple, helping you understand what the photocell does and guiding you through the easy steps of making your outdoor lights smart.

Understanding Photocells
A photocell, also known as a photoresistor or light-dependent resistor (LDR), is a crucial component in outdoor lighting systems. This electronic sensor detects changes in light levels and responds by either activating or deactivating the connected lights.
In simpler terms, a photocell allows outdoor lights to adjust their illumination automatically based on ambient light conditions. This intelligent feature not only enhances convenience but also contributes to energy efficiency by ensuring that lights are only operational when needed.
Importance of Using a Photocell for Outdoor Lighting
The incorporation of a photocell in outdoor lighting systems brings several benefits. Firstly, it promotes energy conservation by preventing unnecessary operation of lights during daylight hours. This not only reduces electricity consumption but also extends the lifespan of the light fixtures.
CIBSE-published research says that 20-60% of any building energy consumption is due to illuminations, and there were evident energy savings due to the use of photocells.
The automatic adjustment of light intensity based on ambient conditions enhances safety and security around the property.
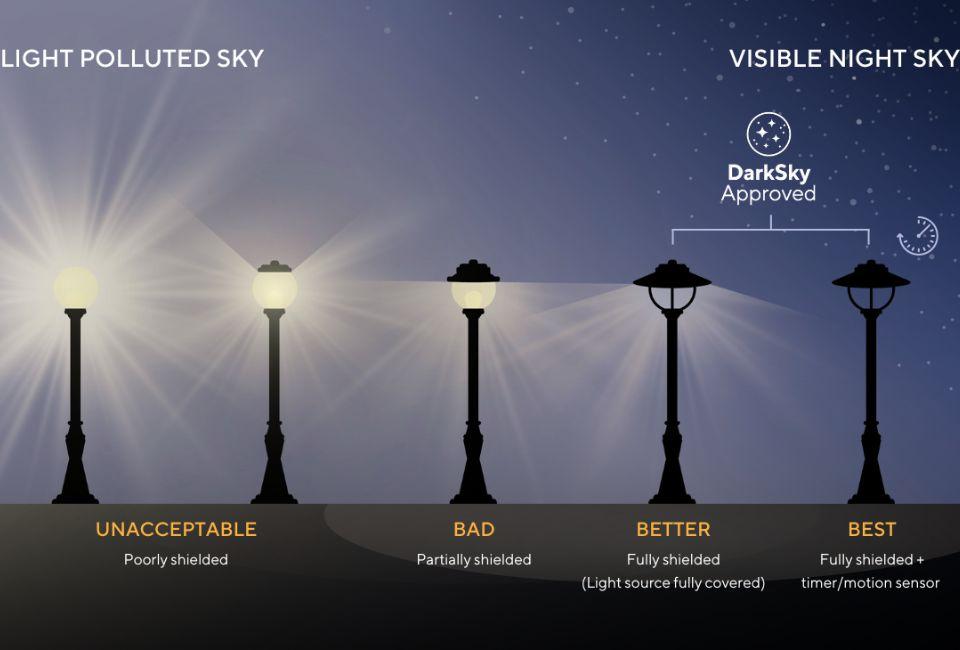
Additionally, the use of photocells aligns with eco-friendly practices, as it minimizes light pollution by only illuminating spaces when necessary. This is particularly important in residential areas, where excessive artificial lighting can disrupt the natural environment and impact the well-being of residents.
Types of Photocell Light Sensor Available for Outdoor Lights
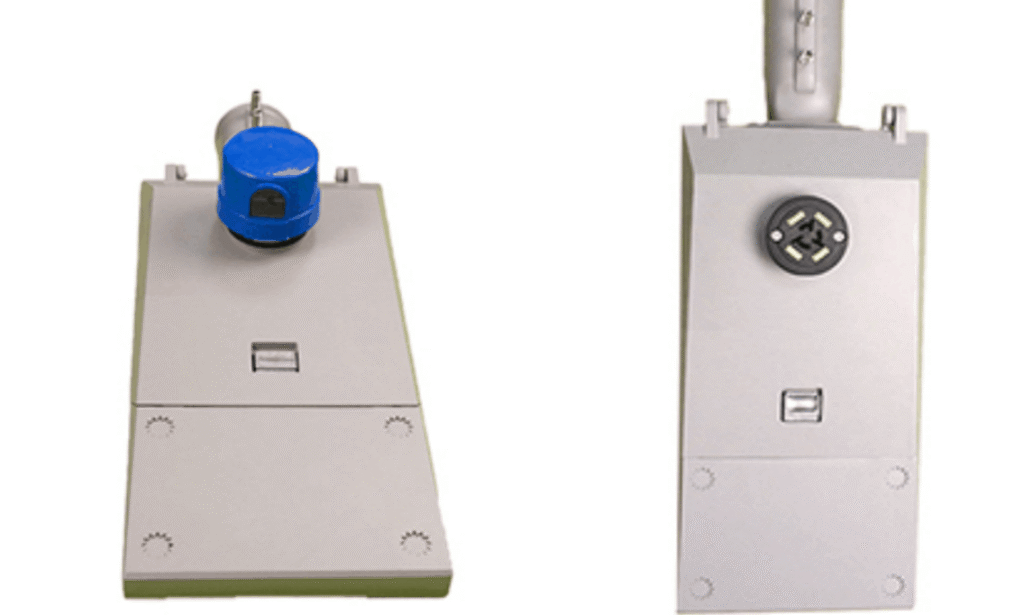
When considering outdoor lighting, there are various types of photocells to choose from, including wire-in photocells, twist-lock photocells, and Zhage photocells. These photocells cater to different preferences and needs, offering functionalities such as dusk-to-dawn sensing and delay timers.
Understanding the distinctions among these types enables individuals to select the most suitable option for their specific outdoor lighting requirements.

Step-by-Step Guide to Wiring a Photocell to Outdoor Lights
Location and Positioning of the outdoor photocell switch
When installing a photocell, choose a location that ensures optimal exposure to ambient light. Ideally, position the outdoor photocell sensor where it can receive unobstructed natural light, allowing it to effectively detect changes in illumination.
Steer clear of obstacles that might cast shadows or obstruct the photocell’s view of the sky. Objects like overhanging branches or nearby structures can interfere with its ability to accurately respond to light changes.
Turning Off the Power Supply
Prioritize safety by turning off the power supply to the outdoor lights. This precautionary step mitigates the risk of electrical shock and ensures a secure working environment.
Locate and switch off the circuit breaker that powers the outdoor lights. It’s essential to identify the correct breaker to guarantee that the electrical circuit is entirely de-energized.
Identifying and Connecting the Wires of the Photocell light switch
Familiarize yourself with the color-coding of the wires – typically, black for live or hot wires, white for neutral wires, and green or bare copper for ground wires. This understanding is crucial for accurate connections.
Use a wire stripper to remove insulation from the wire ends, then securely connect the wires according to their colors. Utilize wire nuts or other suitable connectors to ensure a reliable and safe electrical connection.
Mounting the Photocell
Select a suitable spot on the light fixture to mount the photocell. This is often a designated area provided by the manufacturer. Ensure that the chosen location allows the photocell to function optimally.
Use the provided mounting hardware to secure the photocell to the chosen location. Ensure it is firmly attached to prevent movement or misalignment over time.
Testing the Setup
After completing the wiring and mounting, turn the power supply back on using the circuit breaker. Exercise caution during this step to avoid any potential electrical hazards.
Test the functionality of the photocell by observing how the connected outdoor lights respond to changes in ambient light. Confirm that the lights turn on as the surroundings darken and turn off when there is sufficient light.
Following this step-by-step guide ensures a systematic and safe installation process, allowing you to wire a photocell successfully to your outdoor lights for optimal performance.
Common Issues and Their Solutions while Installing Photo Cell Light Switch
One of the most common problems is incorrect wiring, which can lead to dysfunctional photocell operation. Double-check the wiring connections, ensuring that the live, neutral, and ground wires are correctly matched. Use color-coded wires and follow the manufacturer’s instructions closely. If needed, refer to the wiring diagram provided with the photocell.
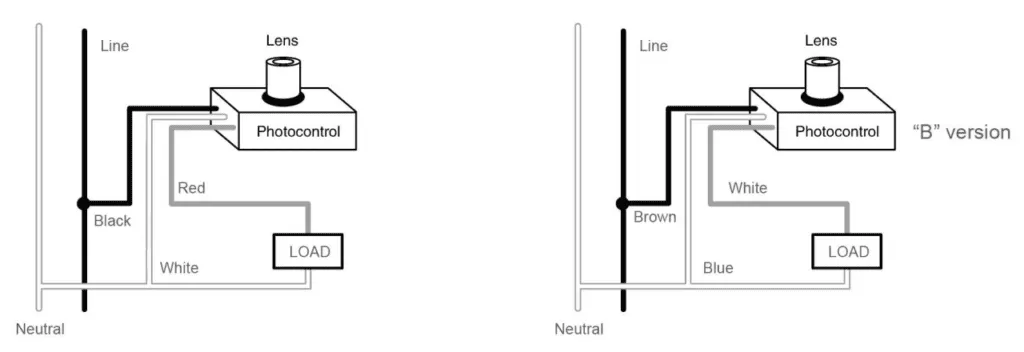
Furthermore, If the photocell fails to respond to changes in ambient light, it may lead to lights staying on or off when they shouldn’t. For this, Ensure the photocell is correctly positioned, avoiding obstacles that may obstruct its view of the sky.
By addressing these common issues and implementing the suggested solutions, you can troubleshoot problems with the photocell and ensure its proper functionality in regulating outdoor lights based on changing light conditions.
Why Choose Chiswear Photocells?
Chiswear photocells are setting the standard for innovation and reliability. Our state-of-the-art sensors seamlessly integrate into your lighting system, ensuring optimal performance and energy efficiency. We prioritize precision in design, offering a range of photocells tailored to diverse needs, from dusk-to-dawn sensing to motion activation.
Trust in the excellence of Chiswear products, where cutting-edge technology meets durability. Illuminate your surroundings with confidence, knowing you’ve chosen a brand synonymous with quality and advanced solutions in outdoor lighting.
The bottom line
Wiring a photocell to your outdoor lights transforms your space with automated illumination. Embrace the convenience and energy efficiency it brings. By following these simple steps, you unlock a seamless lighting experience, ensuring your outdoor area is always well-lit without the hassle of manual adjustments.


