フォトセルセンサー配線図の説明
さまざまな種類の光電セルセンサーの配線図の説明
JL-103
ダイレクトワイヤインサーマルフォトコントロール(従来のボタンタイプ)

インストール
電源を切り、ジャンクションボックスのカバーを取り外し、スイッチをノックアウト穴に置き、ロックナットで固定します。.
図に従って配線します:(フォトセル配線図)

光電セルが人工光や反射光に面するようにスイッチを設置しないでください。夜間にスイッチのオン/オフが繰り返される原因となります。.
JL-104
ダイレクトサーマルフォトコントロール(スイベル一体型)
インストール
電源を切断し、スイッチのネジ山をノックアウト穴に置き、ゴム製ガスケットと亜鉛合金製ロックナットで固定します。.
図に従って配線します:

光電セルが人工光や反射光に面するようにスイッチを設置しないでください。夜間にスイッチのオン/オフが繰り返される原因となります。.
JL-106
直接配線式サーマルフォトコントロール
JL-106

インストール
電源を切断し、スイッチのネジ山をノックアウト穴に置き、ゴム製ガスケットと亜鉛合金製ロックナットで固定します。.
図に従って配線します:

必要に応じて、シェーディング ストリップをスライドして、好みのオン/オフ レベルに設定します。.
光電セルが人工光や反射光に面するようにスイッチを設置しないでください。夜間にスイッチのオン/オフが繰り返される原因となります。.
JL-118A
ダイレクトワイヤインサーマルフォトコントロール

インストール
電源を切断し、スイッチのネジ山をノックアウト穴に置き、ゴム製ガスケットと亜鉛合金製ロックナットで固定します。.
図に従って配線します。

必要に応じて、シェーディング ストリップをスライドして、好みのオン/オフ レベルに設定します。.
光電セルが人工光や反射光に面するようにスイッチを設置しないでください。夜間にスイッチのオン/オフが繰り返される原因となります。.
JL-126
ダイレクトワイヤーインサーマルフォトコントロール(アルミダイキャスト
エンクロージャヘビーデューティー)

インストール
電源を切断し、スイッチのネジ山をノックアウト穴に置き、ゴム製ガスケットと亜鉛合金製ロックナットで固定します。.
図に従って配線します:

必要に応じて、シェーディング ストリップをスライドして、好みのオン/オフ レベルに設定します。.
光電セルが人工光や反射光に面するようにスイッチを設置しないでください。夜間にスイッチのオン/オフが繰り返される原因となります。.
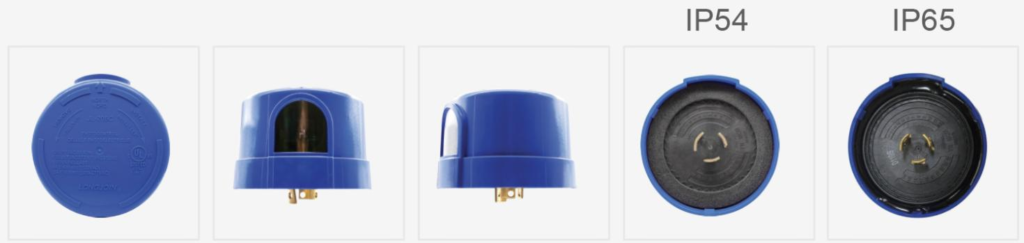
JL-202
熱光制御
NEMAツイストロック
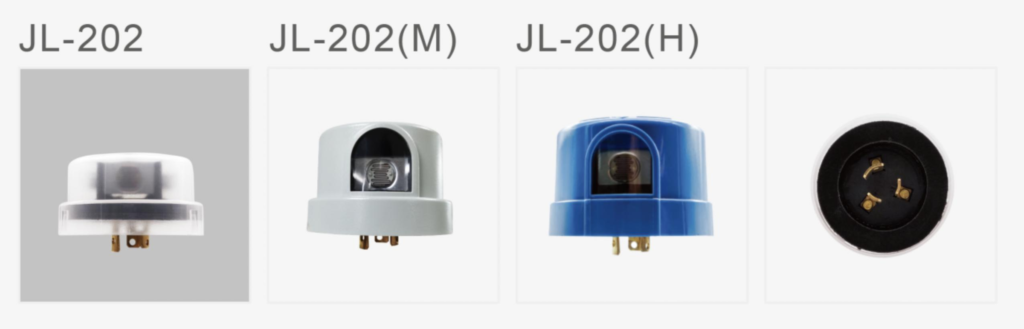
インストール
電源を切断し、下の図に従って色分けされたレセプタクルに配線します。.
フォトコントロールを押し込み、時計回りに回してレセプタクルに固定します。.
必要に応じてレセプタクルの位置を調整し、フォトコントロールの上部に示されているようにフォトセルが北方向を向くようにします。.

JL-205C & JL-205-12D/24D
電子光制御フェイルオン
インストール
電源を切断し、下の図に従って色分けされたレセプタクルに配線します。.
フォトコントロールを押し込み、時計回りに回してレセプタクルに固定します。.
必要に応じてレセプタクルの位置を調整し、フォトコントロールの上部に示されているようにフォトセルが北方向を向くようにします。.

JL-207
デジタル電子光制御(ロングライフバージョン)
インストール
電源を切断し、下の図に従ってコンセントに配線します。.
フォトコントロールを押し込み、時計回りに回してレセプタクルに固定します。.

フォトコントロールの上部に示されているように、フォトセルが北方向を向くようにフォトコントロールを取り付けます。.

必要に応じてレセプタクルの位置を調整します。.
JL-208-IP66
ショートキャップ

インストール
電源を切り、下の図に従ってコンセントに配線します。ショートスイッチを押します。
キャップを閉めて時計回りに回してレセプタクルに固定します。.

JL-312C
電球ホルダーコントローラーLER(シャンデリア)

インストール
· 電源を切断します。;
· E12 ソケットから電球をねじって外します。;
· ライトコントロールユニットをE12ソケットに挿入し、時計回りに回して締めます。;
· 電球をユニットの電球ホルダーにねじ込みます。;
· 電源を接続し、ランプのスイッチをオンにします。.
· 不透明または反射ガラスのランタン内での使用や、濡れた場所での使用は避けてください。.

vJL-401C/401CR
直接配線式電子光制御

インストール
電源を切り、フォトコントロールのネジ山をノックアウト穴に差し込み、ゴム製ガスケットとロックナットで固定します。下図に従って配線してください。フォトコントロールを、光電セルが人工光や反射光に面するように設置しないでください。夜間に点灯と消灯を繰り返す可能性があります。.

JL-403C
ダイレクトワイヤーイン電子

インストール
電源を切り、ジャンクションボックスのカバーを取り外し、フォトコントロールをノックアウト穴に通してロックナットで固定します。下の図に従って配線してください。.
フォトコントロールは、光電セルが人工光や反射光に面するように設置しないでください。夜間に点灯と消灯を繰り返す可能性があります。.

JL-411(R)-12D/24D
ダイレクトワイヤーイン電子光制御(DC)

インストール
電源を切り、フォトコントロールのネジ山をノックアウト穴に差し込み、ゴム製ガスケットとロックナットで固定します。下図に従って配線してください。フォトコントロールを、光電セルが人工光や反射光に面するように設置しないでください。夜間に点灯と消灯を繰り返す可能性があります。.

JL-428
コンジット配線デジタルフォトコントロール(ゼロクロス+FCC)

インストール
電源を切り、ジャンクションボックスのカバーを取り外し、フォトコントロールをノックアウト穴に差し込み、ロックナットで固定します。右図に従って配線してください。フォトコントロールは、光電セルが人工光や反射光に面するように設置しないでください。夜間に点灯と消灯を繰り返す原因となります。.

JL-712A3 Zhaga Book-18 Zhaga コントローラー

配線図

インストール
製品自体のインターフェースは、簡単に設計されており、インストールは
図に示すように、コントローラを回転ベースに直接締め付け、時計回りに回します。
挿入。.

JL-241/242/243
スマート調光フォトコントロール

インストール
電源を切断し、下の図に従って色分けされたレセプタクルに配線します。.
フォトコントロールを押し込み、時計回りに回してレセプタクルに固定します。.
必要に応じてレセプタクルの位置を調整し、フォトコントロールの上部に示されているようにフォトセルが北方向を向くようにします。.

製品のリンクされたすべての図面のより詳細な PDF ファイルが必要な場合は、お気軽にお問い合わせください。
info@chiswear.com